
Drupal's WYSIWYG (What You See Is What You Get) feature allows users to create and edit content visually, without requiring any coding knowledge. The WYSIWYG editor is just what it sounds like: any change you make in the WYSIWYG field in the back end of your Drupal site will be made to the front end of the website once it's been saved. The WYSIWYG editor is integrated into Drupal's content editor interface and provides a user-friendly way to format text, add images, embed videos, and create links.
On this page:
How to use Drupal's WYSIWYG feature
- Log in to your Drupal site and navigate to the content you want to create/edit.
- Once you have found the page or content you want to edit, click the “Edit” tab near the top of the page.
- Navigate to the content row you want to edit and click the “Edit” button. This will show you the WYSIWYG editor where you can make your changes.
You will see a toolbar at the top of the WYSIWYG editor, with various formatting and editing options (i.e.,: Bold, Italic, Strike-through etc.) The options available will depend on the modules and plugins installed on your Drupal site.
WYSIWYG Features
Text
To format text, highlight the text you want to format and click on the relevant button in the toolbar. You can also use hotkeys that you're familiar with from other programs to format highlighted text (i.e.: bold = command+B). For example, you can make text bold, italic, or add bullet points or numbered lists. You can also click the button that says “Normal” to select a pre-formatted heading style for your highlighted content.
If you are copying your text in from elsewhere, such as a Word document, you should always paste without formatting. To do so, use ctrl+shift+v on Windows or cmd+shift+v on Mac. This will remove all the formatting, so you will have to add it back using the WYSIWYG toolbar.
Lists
Creating an ordered or unordered list in the WYSIWYG is easy. With autoformatting, you can type “1.” or “-" and the WYSIWYG will automatically format a proper list for you. Alternatively, you can use the numbered or bullet list buttons in the toolbar to add a list.
Images & Videos
To add images or videos, click on the relevant button in the toolbar. You can upload images from your computer, or you can search your existing media library by browsing through the gallery or by entering search terms for specific images. For videos, you can embed a video player from popular video hosting sites like YouTube or Vimeo.
Links
To create links, highlight the text you want to turn into a link, and click on the “Link” button in the toolbar. You can enter an external URL by copying it from your browser and pasting it into the URL field. To add a link to an internal page on your website, start by typing the title of the page you want to link to in the URL field. Drupal will automatically show a list of content on the site that matches the words you've typed, and you can then select the appropriate page. Once you've entered the URL you want to link to, click “Save”.
PDFs
You can also follow this same process to add PDFs to your page. Simply highlight the text you want to link to a PDF, click the “Link” button in your WYSIWYG toolbar, and click the “Media Library” button. From here you can either upload a new PDF or choose one that's already been uploaded into your media library. Using the “Search” function can help you quickly find PDFs that already exist in your media library.
Buttons
Once a link has been added, you can also turn it into a button! Just click on the text that has now been turned into a link, find the “Styles” dropdown menu in the toolbar, and select “Button”. This is an easy way to grab your user's attention without needing to know any complex styling.
Tables
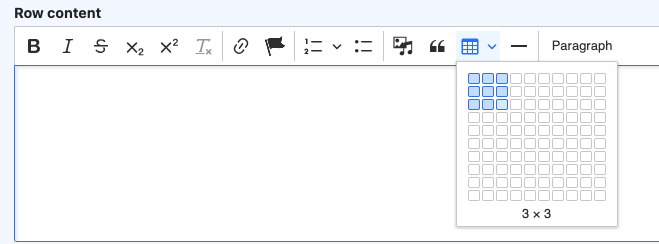
It's now easier to add and edit tables in the WYSIWYG. To add a table, select the table button from the WYSIWYG toolbar. Similar to adding a table in Microsoft Word or Google Docs, just select the dimension you want for the table:
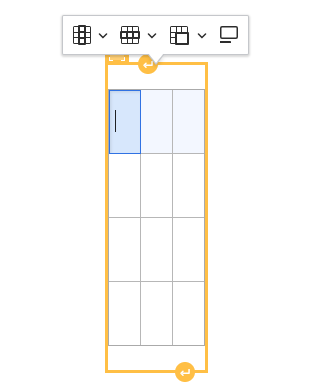
Once you've added a table, you can make edits like setting header rows or columns, adding or removing rows and columns, and adding a caption, from the table toolbar:
You can also use the WYSIWYG toolbar to add special characters, view the source code, and access formatting options. When you're done editing your content, click “Save” to publish it on your Drupal site.
It's as easy as that!
Just remember: What You See Is What You Get (WYSIWYG). Any change you make to your content in the back end of the site, will show up in the front end of the site. This should make it easy for users to create and edit content visually, without needing any coding skills.
We want to hear from you!
Our team at Upanup is always striving to make this guide better and more accessible for our clients. We’d love to hear from you, so we can continue to improve this guide.